• About
  • Blog
  • Contact
  • Favorites
  • Archive
Menu

Poppy Corners Farm

Street Address
Walnut Creek, California
Phone Number
Walnut Creek, California

Your Custom Text Here

Poppy Corners Farm

  • About
  • Blog
  • Contact
  • Favorites
  • Archive

Oiling Outdoor Furniture

July 1, 2019 Elizabeth Boegel
IMG_5820.jpg

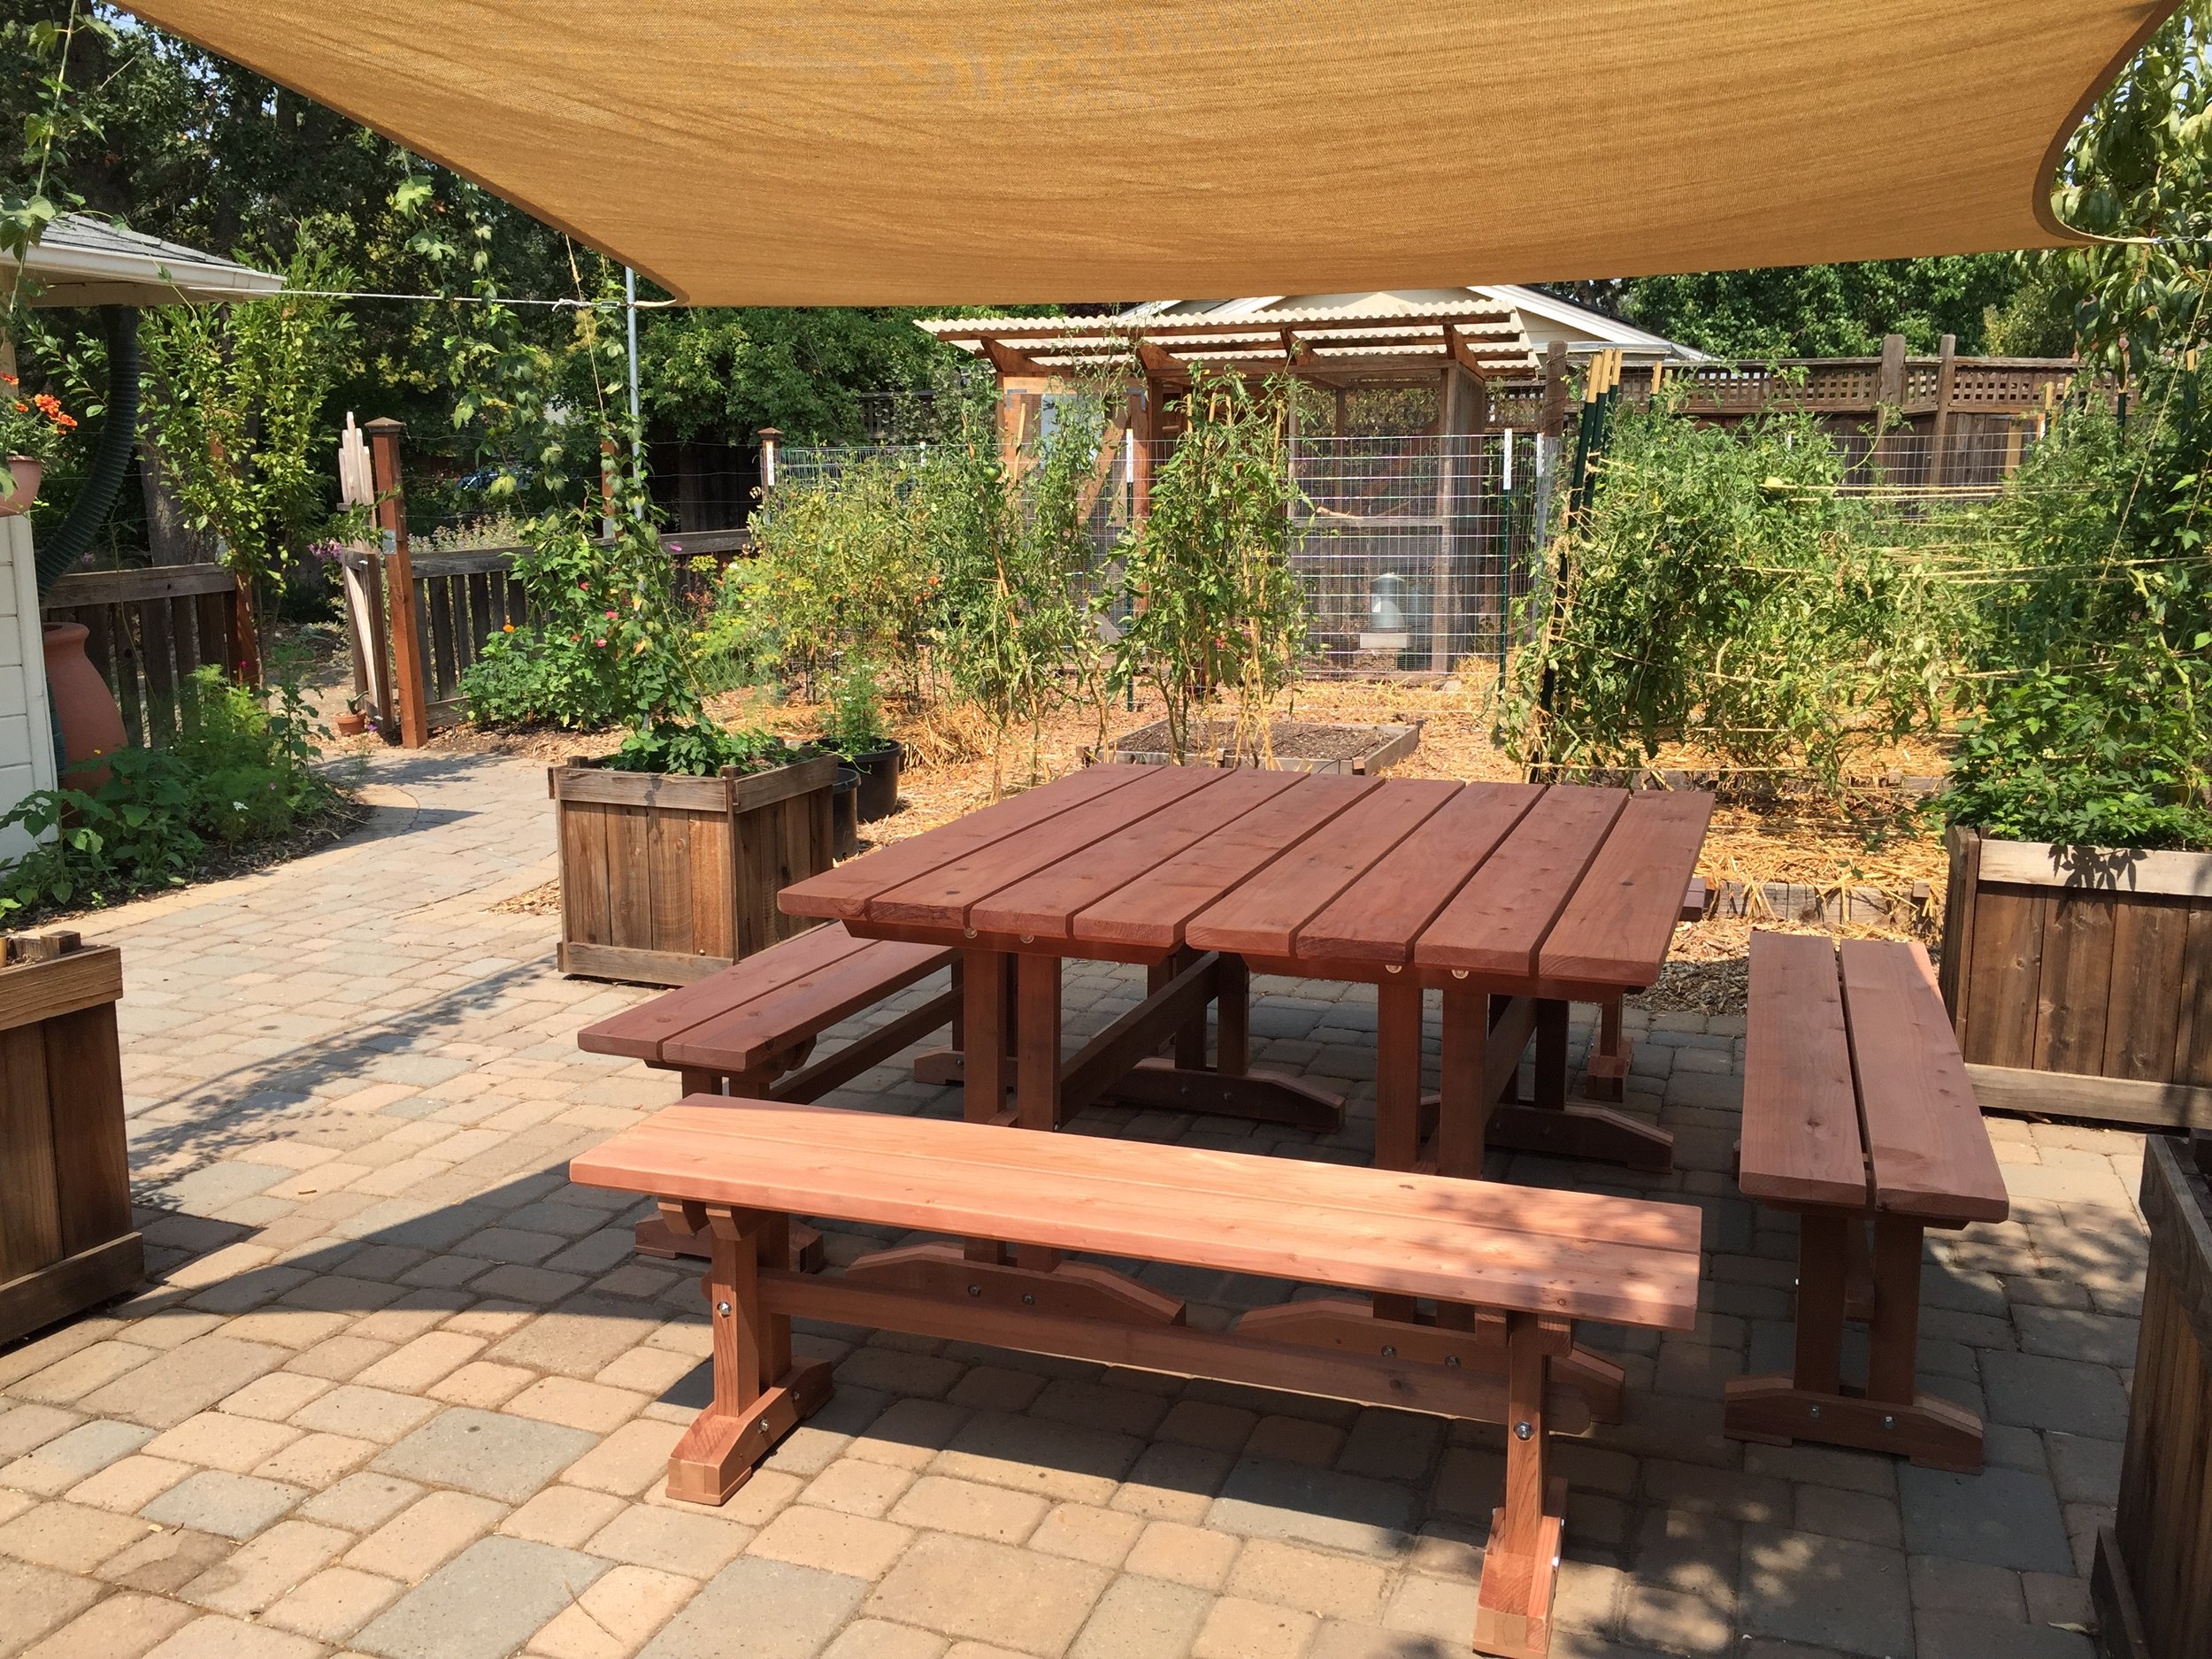
Back in the summer of 2017, Tom asked my father to teach him how to make a farm table for our back patio. They made it together out of redwood, and when it came home, it was beautiful.
IMG_5830.jpg

The table and benches have been outdoors for two years now, and we use them almost daily - really, every day unless it’s raining. The tables get no protection other than the shade sail that you see in the above picture, and that’s only up in the summer. It gives scant shade, enough to eat or work at the table without getting sunburned. Otherwise, the table is open to the elements. After two years of that, the furniture was looking pretty worn out. The redwood had weathered to a lovely grey, but the wood was dry and unprotected.

Growing up the daughter of a woodworker, I had seen the summer oiling ritual play out every year, but somehow I avoided actually performing this chore myself. We have other outdoor furniture that I have never oiled. Once in a while my dad does it for me, or Tom does it. But really, this is a job I knew I should be handling myself, especially in the summer when I am out of school and am available for projects. So, Adam helped me move the farm table and benches out to the driveway (a surface we don’t care about messing up), and after putting on my ‘painting’ clothes, I armed myself with paintbrush, shop towels, and Penofin, and spent a cool morning working on protecting these priceless pieces of furniture.

IMG_2598.jpg

Penofin is the product my dad recommends for any piece of furniture that’s going to be outside, especially if it’s in the sun, as it has some UV-blocking attributes. I used the Penofin that is formulated for redwood. It is made from the seeds of the Brazilian rosewood tree. I don’t know how sustainable that is, but the company assures us that no trees are ever cut down to provide the oil.

There are some steps you should take before oiling your furniture. One is to wash the pieces you will be oiling. I did this with a rag and water, the day before oiling. Dad also recommends giving the furniture a light sanding, as the wood will then take the oil better. Apply the oil in a thin layer with a brush, and then let it sit for 20 minutes to soak in. If your wood is really dry, it might need more than one coat (or multiple coats). After oiling and letting it sit for the requisite 20-30 minutes, wipe off the excess with rags or shop towels. CRUCIAL NOTE: whatever you wipe with cannot just be put in the trash can, as oily rags/towels can self-combust. The company recommends soaking them in a bucket of water, which you can do until your trash pick-up day, moving the sodden material to your trash can. The problem then is, what to do with the soaking water? Our street drains go right to our Bay, so I wouldn’t want to put this oily water down that drain. I suppose you could put it in an area of your yard filled with wood chips, but I’m not sure I’d like an oily residue in any area of my yard - especially in flammable CA. Dad uses shop towels (thick blue paper towels you can get at your hardware store) and after they are used for wiping the furniture, lays them out on the driveway to dry until the next trash pick-up. Skipping the wiping step doesn’t work either, as the residue will dry in a tacky layer, and then no one will want to use that furniture.

Dad also recommends applying a layer of epoxy on the bottom face of the feet, to limit any end-grain soaking of water from the resting surface. I did not do this step.

You can really see the difference between oiled and dry furniture, and it really extends the life of your outdoor pieces. You can also see how the used towels are laid out to dry. It looks terrible, but better that than a fire. It might make sense to do your oiling as close to your garbage pick-up as possible.

IMG_2602.jpg

You also want to make sure to do the oiling a couple of days before a party, as you’ll need time for the wood to fully cure. The brochure says that you can sit on it after 12 hours, but take it from me - a few days is better, and a week is optimal.

Tags learning, preserving
Comment

Just a Little Snooze

June 24, 2019 Elizabeth Boegel
IMG_2178.jpg

We have a LOT of Carpenter Bees in the garden, including one I’ve never seen before, which is almost two inches long and has a golden color on top of the head and back, which may mean that it is male. I have watched a California carpenter bee making a home in our newly painted porch roof, because the power washer cleaned it up and made nice little cavities. I think many have made homes in our fence, and in the rotting wood that I leave lying about in piles. I like carpenter bees, so I don’t mind this one bit.

There are 1600 species of native bees in California alone. The Urban Bee Lab has recorded 400 of them in their UC Berkeley garden (in the middle of the city), so it stands to reason that there are nearly as many that could possibly visit my garden in Walnut Creek. Carpenter bees belong to the family Apidae, along with honey bees, bumble bees, and digger bees. Carpenter bees are the in the Genus Xylocopa, and there are three species that live in California; X. varipuncta, X. californica, and X. tabaniformis orpifex. Most of the ones I see in my garden are X. californica, distinguished by the metallic sheen to their wings. It seems to be rather hard to distinguish the male California carpenter bee from the female, as they are both black - the male has grey eyes, and the female black eyes. I also see a lot of X. varipuncta, the Valley Carpenter bee; the males are golden all over with green eyes and are called, fondly, Teddy Bears.

Lately I’ve been noticing something new - the carpenter bees motionless on a flower for hours at a time in the middle of the day. I know they are alive, because the antennae move when I blow gently on them. But I can even reach out and ‘pet’ them, and they do not stir. I was worried because this seemed unusual behavior, and I’m noticing it nearly every day on different flowers.

IMG_2506.jpg

So I wrote to the Urban Bee Lab, hoping they could shed some light on this behavior. I received a reply almost immediately.

“Hi Elizabeth,

Many bee species have actually been observed 'napping' on flowers! This is especially common in native/solitary bees like carpenters, which don't have a large warm + well-defended colony like the honey bee. Foraging can also be very energetically exhausting for bees so sometimes rest while finding nectar is necessary.

Here's a quick link to a photo of long-horned bees, many of which are native to the U.S., napping: https://honeybeesuite.com/melissodes-sleeping-in-a-thistle/

Best,

Aaron”

Isn’t that cool? More research has revealed that the males often spend the night outdoors, waiting for the sun to warm up their chilly bodies before heading out for the day. However, I’m pretty sure that I’m mostly seeing females having a little nap on a flower in the middle of the day. Sounds good. Wish I could nap in a flower.


Tags insects, bees, IPM, wildlife
Comment

First Day of Summer

June 21, 2019 Elizabeth Boegel
images.png

Hooray for Summer! I’ve posted a four-and-a-half minute video of our garden on June 21, 2019. Enjoy!

Tags videos, vegetable garden, chickens, bees, pollinators, flower garden, herb garden, fruit garden
8 Comments

#ShowYourStripes

June 18, 2019 Elizabeth Boegel
California

California

This is a handy graphic that was invented by Ed Hawkins of the NOAA to show the warming trend of our world. Each stripe is a year; the color is its average temperature over that year, with dark blue being below average, and dark red being above. Most countries start in 1901, but the United States starts in 1895. As you move right, the years move forward, ending with 2018.

With this graphic, it’s quite easy to see how, over time, the world is warming. Above is California.

Go to #ShowYourStripes to input your own information and see how your state, or country, has warmed over time. Check out the FAQ’s. I think it’s a very straightforward and striking way to see how things are changing.

Tags climate, learning
Comment

June Cooking: Cherry Tomatoes and Blueberries (and bonus Focaccia video)

June 17, 2019 Elizabeth Boegel
This delicious picture is from 2016

This delicious picture is from 2016

Father’s Day, 2019: Wandering around the garden, Dad and I discovered two ripe Sun Gold tomatoes, the first of the season. I suppose we should have brought them back to the house and cut them into six tiny wedges to share with Mom and Tom and the kids, but in the moment we didn’t hesitate to pop ‘em in our mouths. Is there anything as good as the first tomato from the garden?

In honor of cherry tomatoes making their way into our gardens, kitchens, and farmers’ markets, here’s a vegetarian recipe that, with a good bread, makes an excellent and filling dinner.

“Pearl Couscous with Olives and Roasted Tomatoes
(adapted from Smitten Kitchen)

2 pints (1-1/2 lbs) cherry tomatoes
3 large garlic cloves
1/4 - 1/3 cup olive oil, plus more for tomatoes
1/4 - 1/3 cup warm water
1 tsp - 1 Tbsp lemon juice
1 tsp sea salt
black pepper to taste
1-3/4 cups broth (either vegetable or chicken)
2-1/4 cups pearl couscous
1/2 - 2/3 cup chopped Kalamata black olives
1/3 cup chopped parsley
1/3 cup chopped mint
1 - 2 tsp chopped thyme
1/2 cup crumbled feta cheese
greens of your choice

Heat oven to 300. Halve tomatoes through stem ends and arrange, cut side up, in one layer on a baking sheet. Add garlic (peeled but whole) to one corner of the pan. Drizzle all with olive oil and sprinkle with salt. Roast until tomatoes are shriveled around the edges, about an hour. Cool in pan for 15 or so minutes.

Bring broth to a boil and stir in couscous, then simmer uncovered for six minutes. Remove from heat and let stand ten minutes. Either let it cool in pan, or spread out on a cookie sheet to cool (it doesn’t stick as much this way).

When tomatoes are roasted, throw the garlic and 1/2 cup of the tomatoes in a blender. Add 1/4 cup olive oil (or more if you prefer more dressing), the water, the lemon juice (I tend to like the citrus on the heavy side), salt, and pepper. Blend until smooth.

In a large bowl, mix together the couscous, the tomatoes, the olives, the chopped herbs, and the dressing. You can eat at room temperature, or cover and refrigerate, but bring to room temp before eating. To assemble for a meal, serve about a cup of the mixture on top of freshly washed greens. Let your guests sprinkle on their own feta.”
— adapted from Smitten Kitchen
IMG_4762.jpg

Here’s a blueberry dessert that is totally satisfying and delicious - and EASY. I found this recipe in a 2012 issue of Saveur magazine, which I got from an older lady cleaning out her cooking magazines. It requires a large amount of blueberries, so either save yours up until you have a bunch, or budget for a trip to the farmers market. It’s worth it!

“Blueberry Slump (adapted from Saveur magazine, barely)

2 cups flour
1-3/4 cups sugar
4-1/2 tsp baking powder
1 tsp sea salt
4 Tbsp unsalted butter, cubed and chilled
1-1/4 cups milk
1-1/2 lbs blueberries
1 cup orange juice
1/4 cup lemon juice
vanilla ice cream, for serving

Whisk together flour, 1/4 cup of the sugar, baking powder, and 1/2 tsp salt in a large bowl. Cut in the butter, or use your fingers to rub into the flour mixture until pea-sized crumbles form. Add milk, and stir until just moist. Cover and refrigerate dough until needed.

Heat oven to 400. Put blueberries in a large cast iron skillet. Add remaining sugar, salt, and citrus juices and bring to a boil over high heat, stirring to dissolve sugar. Remove pan from heat, and using two large spoons, portion and form chilled dough into 2-3” oval dumplings, dropping them evenly on top of the blueberry mixture (I make about six). Transfer skillet to oven (might want to put it on top of a cookie sheet or some foil, as it might boil over in the oven a bit). Bake about 25 minutes until biscuits are baked through. Serve with vanilla ice cream.”
— adapted from Saveur Magazine

Adam has been making a focaccia recipe from Samin Nosrat of Salt, Fat, Acid, Heat fame. Click THIS LINK to see the video in which they demonstrate making it. Take it from me, it is the absolute BEST focaccia we have ever had. Adam likes it with oil and vinegar to dip; I like it just warm and plain. SO GOOD.

Happy Cooking!

Tags cooking, seasonal recipes, tomatoes, fruit garden, vegetable garden
2 Comments
← Newer Posts Older Posts →

Subscribe

Sign up to get email when new blog entries are made.

We respect your privacy. We're only going to use this for blog updates.

Thank you! Please check your email for a confirmation notice to complete the subscription process.

Summary Block
This block is invalid. Please check the block settings and try again.
Featured
Aenean eu leo Quam
Aenean eu leo Quam

Quisque iaculis facilisis lacinia. Mauris euismod pellentesque tellus sit amet mollis.

Read more →

Powered by Squarespace