New Honeybee Colony

After I lost last year's colony of bees due to Varroa Mites, I immediately started researching where to buy a new colony. It's harder than you think! Last Spring, I obtained them from my local beekeeping association, which was fine, but I thought getting them directly from the source might allow me to learn a bit about their practices and provide an interesting field trip. I ended up ordering four pounds of Italians from Taber Honeybee Genetics in Vacaville (I also ordered four pounds for Dad, as he wanted to start another hive). I would have much preferred finding a swarm - I am starting to believe that swarms are generally healthier and stronger, having proved themselves genetically over time. However in all my hikes and walks with Joe, I never found one. So I went with my original plan, and today Dad and I went to pick them up.

Vacaville is about halfway between my home in Walnut Creek and Sacramento. Its history is in farming; and indeed we passed many almond orchards along the way. Once you travel back past the strip malls and restaurant chains, it's farm country.


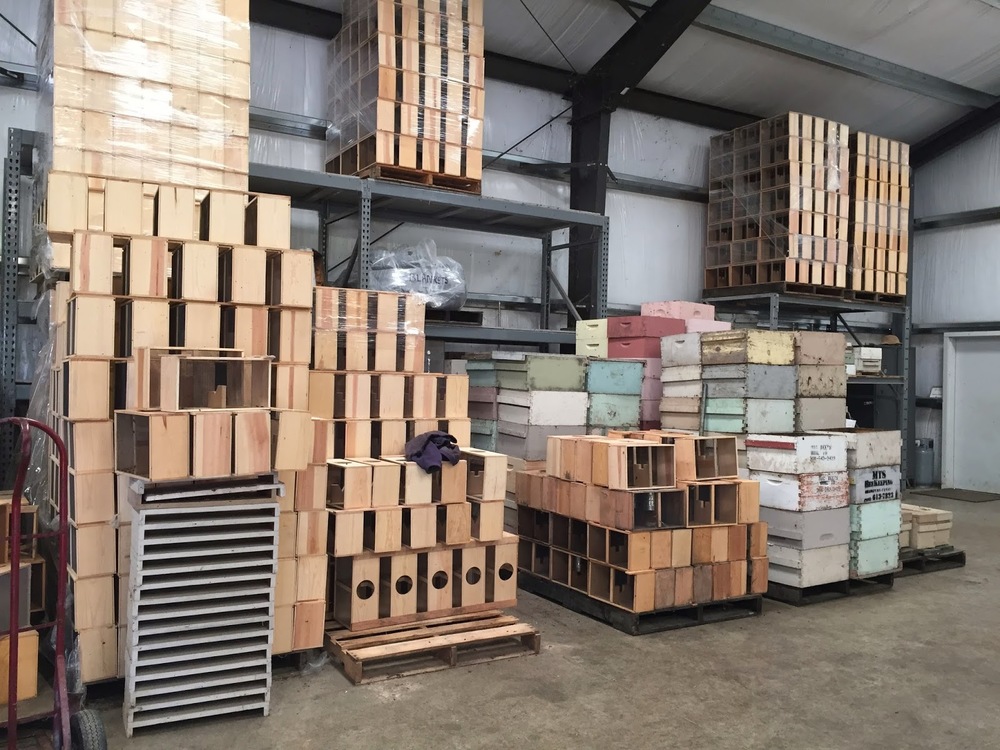
The bee warehouse was unmarked, and surrounded by fields of wild radish in bloom. We weren't the only ones picking up our packages; there were several other families there as well. Inside the warehouse were the packaged colonies waiting for pickup, and walls full of wood, nucs, and supers.


We were lucky enough to talk to both the guy in charge, and the guy in charge of bees (two different people). The guy in charge generally warned us about Varroa and Nosema (an intestinal infection) and gave us instructions on how to treat those problems, which gave both me and my dad lots to think about, as neither of us have ever treated our honeybees (and we've both lost hives). Let's just say, for now, that the treatment didn't seem as horrible as I thought it would be. And the guy was adamant that we treat even if we see no sign of disease, as it's hard to see until it's too late. More on this in the Autumn, which is when we'll need to think about it again.

Then we got to talk to the guy in charge of bees, a quiet gentle man who spent a lot of time answering our questions about how the operation works. The company rents out 4500 hives of bees each year, first to the almond orchards, then to the sunflower fields when they bloom. In between they feed on wildflowers. That's the first 'tier' of their business.

The second tier of the business is raising queens. Behind the warehouse, there were about six 'breeding' colonies, as he put it, which provide the larvae.


Every two weeks, the beekeepers remove three-day-old capped larvae from these hives and insert them into special frames, 45 to a frame, which are then inserted into about 20-30 queen-less hives in another area.


Any larvae can become a queen, of course - it just needs to be fed royal jelly for the entire larval development period. And that's what these queen-less colonies do, of course - they get excited that there is a potential queen, and they feed the larvae solely on royal jelly. (Royal Jelly is a combination of digested pollen and nectar mixed with a chemical secreted from a gland in the nursing bee's head.)

After ten days, the beekeepers remove the frames of queen larvae and put them in an incubator. They do this because the queens will kill each other if they hatch in the hive (there can only be one queen, after all). After the queens hatch, they sell them to folks who need to re-queen a colony, or add them into the packaged colonies which we purchase, or queen a hive that needs one in their own yards. 

And, just so you don't feel sorry for the queen-less hives, after a couple of cycles, they provide them with a queen that they can keep, and they use a different colony for the purpose of raising queens. It's all so fascinating!

Dad and I seemed to be the only people asking these questions, and we were the only ones to prowl around the warehouse checking out the bees. If I could urge everyone to do one thing in their lives, it would be to be more curious, about anything and everything! I learn so much from asking questions no one else asks. I often get to go behind the scenes, because everyone likes to talk about their job, if they're proud of it. Rangers are a perfect example. The next time you're at a park, talk to the ranger! Ask questions! You'll learn more in 15 minutes than you ever thought you could.

Anyway, we brought the bees home (buzzing all the way! So good to hear that sound again), and then they had to sit in a cool, shady place for the rest of the day, chilling. It's always advised to put your new colony in the hive in the late afternoon, so the bees can get used to their new digs before exploring the terrain. 

Finally it was time to release them. I set out all the tools I'd need, made sure I had the sugar syrup all ready to go, got rid of a few stray spiders in the hive, and then Tom and I made a plan. Tom was dressed in long sleeves and a hood; I chose to not prepare in any way except wearing gloves, thinking that I'd be fine. We lifted out the can of sugar syrup that is included in the colony, and bees came swarming out. 

The first job was to wire the queen cage to one of the bars in the hive, and uncap the candy plug that is at one end of her cage. The worker bees will chew through the candy to release the queen, and that is how they all get to know her before she starts laying eggs. The queen cage was simply covered in bees, and it was hard to get a wire on with gloves and uncap the candy. Finally I just took of my gloves and did it. Once the queen was in place, we could shake the rest of the bees from the nuc into the hive. Tom shook and shook and shook, and still there were some clinging and refusing to go into the hive. I left the nuc out by the hive so the stray bees can find their way up and inside. Four pounds of bees is a LOT of bees (about 3,000 per pound!), and they were crazy. I guess I'm just used to bees being very calm and not too disturbed by what we do - I don't remember it being so nuts last time! But it was nuts. We couldn't get the bars in, because everything was covered with bees. A bee flew up Tom's shirt; he had to go take care of that. We needed smoke, and hadn't even lighted the smoker, so Tom had to go get that and get it started. Of course then it went out and we needed to do it again! A bee got tangled in my hair; I had to walk away quickly and go get my hood. I cannot describe how many bees there were EVERYWHERE. Thankfully the kids were in the house, the dog was in the house, the cat was either in the house or hiding, so we only had to worry about ourselves. It took forever, but we patiently smoked the bees off or brushed them off with our bee brush until we could get the bars in. Then there were a lot of bees back behind the divider - we use that to keep the hive a manageable size for the bees until the colony grows - and we had to get all the bees out from the back of the hive. More spiders, really gross spiders, crawled out. It was bug Armageddon. 

Somehow I managed to take pictures during all this. And somehow - I do not know how - neither one of us got stung. That's pretty amazing. 


And here's a 10 second video of the chaos.


We walked away and left the bees to get acquainted with their new home. About an hour later, they were settling down and figuring out the whole system. I hope they like it here. I hope they decide to stay. I hope the queen is viable. I hope a lot of things, but we can only wait and see how things go. I'll open the hive next weekend and check to see that everything is ok with the queen; it will be hard to wait. Meanwhile you'll find me out in the garden, just watching.

Worms and Lacewings (and a fat Tom Turkey)

Every year I order worms for the compost bin.

My original compost bin is rather small (we now have three total, two of which are quite large). Because it doesn't generate enough heat by its size and volume of material, I need to add worms to help with the decomposing process. I generally get a pound every year or so. This year, I ordered from a new place, The Worm Farm. They are fairly local, up north, and the worms arrived today.

What do you suppose the letter carrier thinks of this?
Within the box, the worms are usually packed in a muslin bag, with dirt and shredded paper. A pound of worms is about 1,000 - so the bag is pretty packed and squirmy.


Upon opening the bag, I was pleased to see a lot of dirt and not a lot of shredded paper. Better for the worms.
Then you release them into your compost. The worms tend to burrow down in the contents of your bin pretty quickly; they like to be at the lower levels, it seems to me.


You don't want to buy just any worms - you want Red Wigglers - or Eisenia Fetida. These are different from earthworms. Earthworms are great! But Red Wigglers are master composters. 

I've also already noticed aphids in the garden. Only on the roses that are left (only three now - I've taken out dozens that were here when we moved in), but they could spread and often do. I've released ladybugs before, but they just tend to fly away - it's larvae you really want anyway. So I bought Green Lacewing Larvae from Arbico Organics, 5,000 eggs. They also arrived today.

The postman is really freaking out now.
They were packed nicely, in a heat-shielding bag, in a tiny container.


They were packed in bran. I scattered them in three places - on the roses where I've seen aphids, and in both the North and South veg gardens.


The instructions said I probably won't see them hatch. But I sure hope to see them flying around the garden, eating up all the baddies.

I also use a garlic spray for aphids. I chop up a clove a garlic, add it to the sprayer along with some dish soap and water, and then I spray it directly on the affected area. It works a treat. But I don't like to use the spray on veg, so that's why I was proactive about the lacewings.

Of course, turkeys are a regular part of living here in the foothills of Mt Diablo, but heading up to the open space to walk Joe today, I came upon a whole passel of males, displaying. It was spectacular. I got a shot of the largest one.

I don't know if the female turkeys are impressed, but I sure was!

His wings made a funny sound, dragging on the pavement. He wasn't concerned about me at all, just as proud as proud could be. 

It's raining creatures around here. Tomorrow I go pick up the new honeybee colony!

Getting it done, one bed at a time

Earlier in the week, we managed to get the tomatoes and peppers planted and caged. We had to make six more tomato cages, and had to use some cucumber cages for a couple of the peppers. But everything is in and that makes me feel good! Especially because we had rain shortly after.


Of course, since then we have had chilly nightly temps, dipping down into the low 40's, so I didn't feel ok leaving the plants exposed. I couldn't cover them, with those cages. So I decided to swaddle them in towels and blankets. It looks mighty strange, but seems to be doing the job.


I also managed to get one potato crop planted. We made this cage out of hardware cloth (wire mesh) last year, and the potatoes did wonderfully in it, until the deer got to them. So, I'm using it again. Half of our seed potatoes are layered in the bottom with some of the good soil we had delivered last week. 


The basket needs to be lined with newspaper (or burlap) so the dirt stays put, and as the potato vines grow, we'll add more dirt, until finally the entire thing is filled. We'll make another cage for the remaining potatoes, this weekend.

I pulled out the chard, as it was starting to look pretty peaked. This was the "Bright Lights" variety from Renee's Garden.


It sure was pretty, and also tasty, and fed us through the winter and into April. So we'll definitely plant that variety again! This weekend, I'll get some romaine in, where the chard used to be. It's supposed to be warm during the days, but still in the 40's at night for the next week, so I'll probably hold off on everything else until later in April.

Today as I was checking on the chickens, I noticed this interesting guy perched on the dead branch of a sunrose:


Isn't he beautiful? Looks to me like a male Flame Skimmer. Of course we have water in the yard, in the form of a water feature, and also some shallow water and mud pits for bees and butterflies, but I never expected to see dragonflies here. But in researching it, I found that only the dragonfly larvae feed on water bugs. The adults feed on moths, flies, and ants, all of which are in great supply at Poppy Corners. I gotta say, when we increased our plant production, we also increased our insect population, which has increased all kinds of other populations. First I noticed lizards and salamanders everywhere, now dragonflies? Pretty cool. I'd say we've got habitat going, for sure. Are snakes next?

Speaking of habitat, I'm already thinking about fall projects. I know, our spring projects aren't even completed yet, but I've got an idea and I can't shake it. I'd like to replace the tiny bit of lawn we have left with a meadow full of native grasses, flowers, and bulbs. This caused me to get out the books. You know, the BOOKS. Do you have a pile of books like this? The ones you consult when you get a bee in your bonnet? These are my favorite resources:


And this time I went right for "The American Meadow Garden," by John Greenlee. I've spent some time over the last few days re-reading this book and figuring out how it will all work. I'm very excited to try this experiment. But - like I said - this is a fall project, because fall is the best time to plant in Northern CA. The ground is still warm and the rains are coming. (At least we hope they are.) 

Speaking of rain, I suppose you've heard of California's mandatory water restrictions. Our new drip system is basically going to take us down the required 25%. We're thrilled. Of course we'll also continue to use the rain barrel when it's full (as it is right now, hooray!) and cut down our use in the house. We won't water that tiny lawn at all, and I'll let it die in preparation for the fall meadow planting - it couldn't be more perfect.

I think that's all I have to share with you for the moment. I'll leave you with a beautiful flower I found while hiking in Shell Ridge the other day. It took me a long time to identify it - finally I asked East Bay Regional Parks to help me, and they sent me the greatest resource! A website with all the wildflowers of the parks listed by color. And there it was - this purple salsify. A European transplant - but lovely all the same!


Happy Easter!


Happy Easter! This is a happy day! And Happy Passover, a couple of days late!

Our kids still get Easter baskets, because you're never too old for chocolate, or Legos.


Our neighborhood has a big egg hunt for the little kids, and then an outdoor brunch. Everyone brings a dish to share, and whatever patio furniture they can haul over to the yard where the brunch is held. This year I volunteered to do the flowers for the tables. There's a lot blooming already, so it was fun to make about 10 tiny posies, or Tussie-mussie's, as I like to call them. I know very little about flower arranging, but it seems to me that if you add a lot of color and variety, they turn out nicely.

Everything laid out for arranging

Here they are all together, waiting for transport


Saturday was the Great Tomato Sale, a local fundraiser put on by the Master Gardeners. I bought four slicing tomatoes, four cherry tomatoes, and four paste tomatoes. I also bought four sweet peppers and four hot peppers.


I plant most everything else from seed, including a few herbs like cilantro and basil. (Other herbs, I buy starts.) I don't know why I have a mental block about starting my own tomato seeds indoors and then transplanting them in to the garden - it might be that we just don't have room - it might be that I don't want to buy all the equipment, like grow lights. I'm happy supporting the Master Gardeners, who do good work, by spending a very reasonable $3 per veg.

Nothing got planted this weekend, though, between one thing and another (and a little RAIN!), so I'll try to get to that this week.

But first, I have to solve a problem. We're having some issues with Tasha the cat in the prepared, but unplanted, raised beds. And Joe the dog has been digging near the huckleberry. This never happened on the South Garden, but this back garden is firmly in house-cat/house-dog territory and I think the pets are really noticing that their hang-out space has been reduced. For the dog, I noticed that the digging happened when I hid his frisbees (because they are always littered around the yard), so I've given him those and hopefully that will appease any boredom when he's left alone in the yard (which isn't often, let me be clear). For the cat, I'm going to try a technique I found on the web, very scientific :), where you stick plastic forks, tines up, in the beds. I can't imagine those will feel good on soft padded paws. I'll let you know how this works. I'm not worried about beds where I am planting seedlings and cages, I'm more worried about where there are seeds. I don't mind pee - pee is nontoxic and a good source of nitrogen - but I don't want feces in the beds. And I don't want things dug up after the hard work of planting them.

I had a wonderful afternoon walk with Joe in the foothills of Mt Diablo/Shell Ridge area on Saturday. The hills are so green right now, and the wildflowers really lovely.

CA willow tree seed pods

Hills covered in purple vetch

Elegant Brodaiea

Blue-eyed grass and vetch

As I was heading toward the gate at the end of our walk, I looked back up the hill and saw a creature  loping down. Something made me stop and watch. It continued loping down towards me, while another one split off and went up the side of the hill. As the creature came closer, I realized it was a pair of coyotes, and the one heading my way was still coming, and was going to cross my path. I moved forward with Joe and got to the gate and watched the coyote lope up the opposite hill, then stop and look around. It was young and fairly small and quite beautiful. Normally coyotes, though curious about humans, stay well away as they are very shy. This one seemed unafraid. 


I love seeing predators in the wild. Mostly because it's unusual, I guess, where deer and turkeys are as common as  pets, it seems. I've never seen a cougar but would love to.

Hope you're having a wonderful Easter weekend, and that it involves chocolate. :)

New Raised Beds, plus news about the Urban Farm Tour

Last November, if you recall, we sheet mulched the North Garden in preparation for this week. The area had been grass and had housed first a play structure, and then a trampoline. About two months after we laid down the sheet mulch, we built the chicken coop. This week we finally began the raised beds in this area of the garden.

The first step is to stake out where you want the beds to go, which Tom did with 2"x2" redwood stakes and some string. After those are in place, it's important to rake the wood chips out of the beds. I didn't do this last year in the South Garden, and we had serious nitrogen issues, or more precisely, lack-of-nitrogen issues. When soil mixes with wood chips or mulch, the nitrogen in the soil immediately goes to work breaking down the mulch, and that work of decomposition ties up all the available nitrogen, leaving none for your seedlings. So learn from my mistake! Rake out the wood chips before you build the beds and fill with soil.

Staked 'n raked

The next step is to purchase lumber, either redwood or cedar, to build your raised beds. Tom likes redwood, and he buys 1'x8' boards. These can be made into either 4x4 beds or 4x8 beds quite easily, with few cuts. He then puts them together with deck screws. This project takes about a day, depending how many beds you're making.


The lumber and the soil are the priciest part of this project. But the beds will last for many, many years, and I'll never have to replace the soil in them - just amend with manure and compost and occasionally top off.

As Tom was working on the beds, I noticed some stubborn Bermuda grass growing in the dirt under the mulch. I hate this stuff. It spreads so incredibly easily and is so difficult to kill. So I spread a little bit of cardboard in the bottom of the beds to help smother it.

The next step is dirt! It takes more dirt than you think to fill raised beds. I ordered 5 cubic yards, which will take care of the new beds, and anything left over will top off the six beds in the South Garden. I ordered it from American Soil in Richmond. I decided to try their special blend called "Local Hero Veggie Mix," which is a mix of sandy loam, green waste compost, rice hulls, chicken manure, grape compost, fir bark, and cocoa bean hulls.  

It smells so good and is steaming and cooking in there! Living soil, for sure.
The dirt was delivered at 8:30 this morning, so now you know what the day ahead holds for me. 

We've had some fun this week, too. The kids and I went with my folks to the de Young art museum in San Francisco, where we got to see some Impressionist art from the Scottish National Galleries. My favorite piece was a Cezanne, called "The Big Trees." I learned an awful lot about painting from looking at this.


The kids' friends have all been traveling on their breaks, but some were finally back in town, and a few stayed for dinner last night. Dinner outside with friends and a fire in the fire pit - this says 'summer' to me, for sure. I know we're pushing that envelope, but still... it was all I could do not to break out the s'mores.


The Institute of Urban Homesteading has just announced the Urban Farm Tours for this summer, in their spring newsletter. Here is a description of the Walnut Creek/Concord tour: 

Walnut Creek & Concord June 6 9am-3pm
Featured Sites
How It Works
Your ticket includes 3 urban farm tour sites and one special interest site (choose at ticket purchase), plus morning hospitality and a simple homegrown lunch.
Come to the staging area in the morning topick up your itinerary, come back for lunch f you desire.
General Admission $40, kids $25,
Friends of the Farm Tour Ticket $60 (includes a gift of farm fresh egg or honey from our farmers)
Patron of the Farm $80 farm fresh eggs or honey plus Ruby Blume's Book, Eveyday Cheesemaking

Tickets on sale April 15

And here is how our farm is described!

Poppy Corners 
Hosts: Elizabeth & Tom Boegel
Lot: 7,000 sq ft
Used for agriculture: 4,000 sq ft

Poppy Corners is a testament to what one suburban family can accomplish while raising a couple kids and going to work full time. This thriving hobby farm resides in a tidy neighborhood of overwatered lawns. Most of the grass has been replaced with 14 vegetable beds which produce year-round. There are fruit trees, bushes, vines, and canes interspersed within a perennial garden, as well as vegetable patches tucked in between the flowers. Whatever land is left is devoted to native and drought-tolerant plants and flowers for pollinators. The Poppy Corners farmers raise bees and chickens. They build their own structures wherever possible and tend the garden and critters themselves. They continue to research and apply new ways to use less water in the hot and dry summers, and to catch water in the winter. Diverse farming methods are employed from permaculture principles to square foot gardening. Come enjoy research in process! 

We are really excited and hope you will attend and support this effort, if you are anywhere near the area!