• About
  • Blog
  • Contact
  • Favorites
  • Archive
Menu

Poppy Corners Farm

Street Address
Walnut Creek, California
Phone Number
Walnut Creek, California

Your Custom Text Here

Poppy Corners Farm

  • About
  • Blog
  • Contact
  • Favorites
  • Archive

Pollinator Turnover

June 28, 2020 Elizabeth Boegel
IMG_4532.jpg

This is how the South Pollinator Garden looked on June 1. The poppies had largely finished flowering, and the Clarkia ‘Farewell to Spring’ was just starting to bloom. Everything was tall and green. But by last week, the Clarkia had begun to brown and topple, and though it still had plenty of flowering left to do, I wanted to do the summer clean-out and turnover, so that I could begin growing the flowers that will bloom all summer and right up to our first frost.

This is a massive project that I do twice a year - once around now, and then again after the first frost. As I have said recently, I’m starting to think about doing something different in this area. I’m still mulling it over, but it will surely be a winter project, so I have some time to think more about it before I make any big changes. Anyway, yesterday I spent the day clearing out the old stuff, everything I didn’t want to keep, all the annuals that were spent as well as some woody perennials that were past their prime. I filled up two green bins (mine and my neighbor’s) and added several feet to the compost pile. This morning, Tom and I went out together and moved the drip lines out of the way, cleared and righted all the stepping stones, and then spread 6 cubic feet of compost over the ground. We replaced the drip lines, made sure they were all working correctly, and then I seeded several different summer/fall annuals: Cosmos (‘Purity’), Zinnia (‘Cut and Come Again’), Cornflowers (mixed colors), Tithonia (Mexican Sunflower), and Rocket Larkspur (blue). I decided to sow these in patches of single species rather than mixing them all up and flinging them everywhere. If it works, we’ll have patches and lines of different flowers for cutting. It’ll be a bare month in this garden, as the plants grow, but the bees have lots of other food to eat right now - the other borders are full of blooms, and the beds are full of squash and pepper and cucumber blossoms.

This is how it looks now.

IMG_4726.jpg

Quite bare, which is one of the reasons I want to rethink this area.

Meanwhile, here are some photos of the plants that survived and that I love.

Clematis ‘Arabella’ - this is a type 3 clematis which requires cutting back to the ground in winter, so that it blooms on the growth put on in spring.

Clematis ‘Arabella’ - this is a type 3 clematis which requires cutting back to the ground in winter, so that it blooms on the growth put on in spring.

a Monardella (I don’t know which kind) that reliably comes back year after year

a Monardella (I don’t know which kind) that reliably comes back year after year

Dahlia - can’t remember which kind, but it has dark foliage. I’m in love with dark-leaved dahlias and have added several more this year in other places.

Dahlia - can’t remember which kind, but it has dark foliage. I’m in love with dark-leaved dahlias and have added several more this year in other places.

Eryngium

Eryngium

This was a weekend well spent in the garden, tying up cucumber and bean vines, and adding cross-braces to the squash trellises. Meanwhile we have been getting a few cherry tomatoes a day, and the big ones are starting to break and change color. Tomato season, hooray!

Tags flower garden, pollinators
Comment

Braiding Day

June 21, 2020 Elizabeth Boegel
IMG_4692.jpg

Last year, despite planting two beds of garlic, our harvest was extremely stingy. The bulbs were small and underformed, and while we used it as long as we could, it was a pain to peel and mince. I had trouble with my shallots last year too, so I gave myself a list of to-do items to make sure that this year’s garlic looked great. (The shallots, another story, as they were felled by allium aphids. We’re going to give shallots a pass for the foreseeable future.)

Here’s the my list, which I followed mostly to a T (I’ll explain outliers below): “So, this Fall, here’s what I’m going to do. One, order seed bulbs directly from the grower (Filaree Farms has been recommended to me). Two, I’m going to plant them later, in November rather than October. Three, I’m going to plant less of them, only one bed for shallots and one bed for garlic. Four, before I plant, I’m going to break my no-till rule and make sure the soil is loose and that I’ve added plenty of compost and maybe some grit to increase drainage. Five, I will interplant with crimson clover, which should add a place for the good bugs to proliferate. Six, I will plant them in a place that has more shade in April (and maybe cover them too), and not in the place where I want to put tomatoes next year, which need to go in May 1, which is part of Seven, I will leave them in the ground until June. Eight, I will remove the irrigation lines for the last month of the growing season. Nine, I will make sure they are totally ready before harvesting. Ten, I will cure them differently, in a different place, allowing more airflow and more time (this will be difficult because they need to cure in shade). And finally, I will allow them to cure for longer, and inspect them thoroughly, before I bring them in the house.”

IMG_4697.jpg

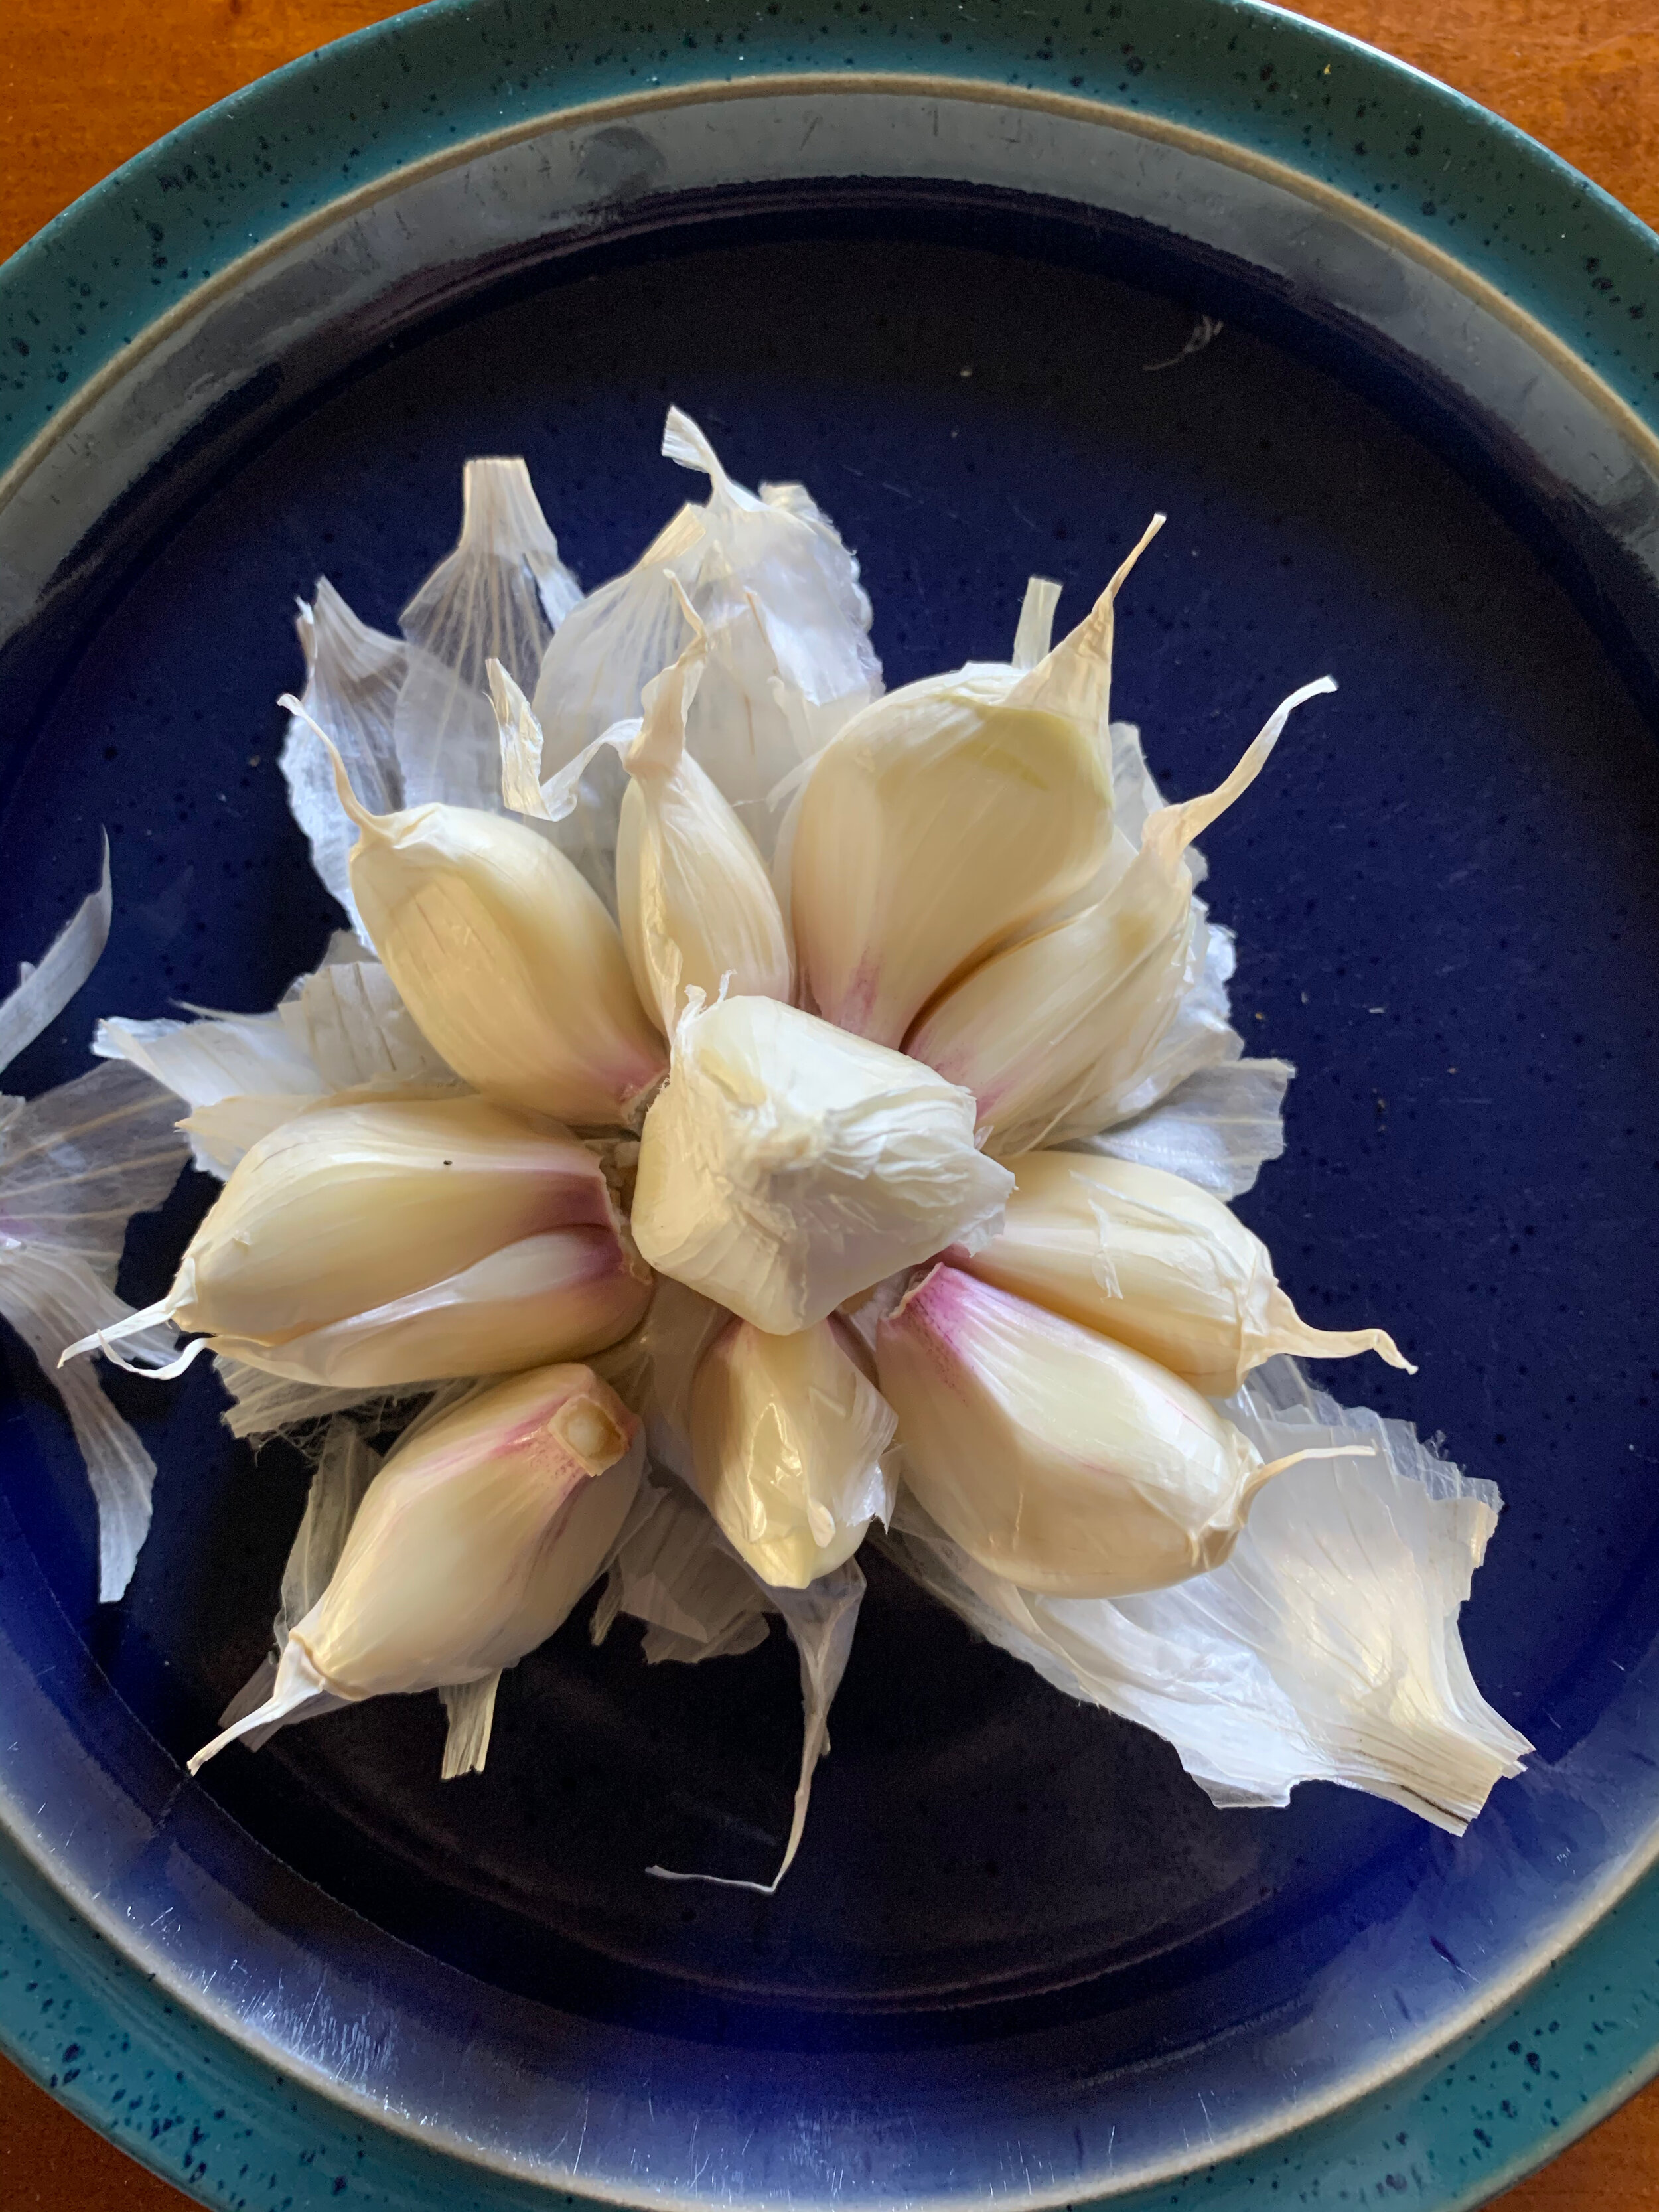
Well, what do you think of this year’s crop? Doesn’t it look marvelous? We yielded about 60 bulbs, enough for one per week with a little extra to either use or save for seed. The bulbs are fat and well-formed, and the individual cloves are huge. The skin is extremely papery, as we dried them in the hanging garage rack for four weeks solid. They were easier to trim and braid. It tastes excellent. In short, even though I harvested it just a touch early, it was a perfect result.

IMG_4703.jpg

This variety, which we have decided is our favorite of all the kinds we’ve tried, is an heirloom called Inchelium Red. I got the seed garlic from Filaree Farms (and they are already selling for fall delivery, so I would buy now before they run out) up in Oregon.

If I had to choose one thing of the many that I did differently this time, I would say the drying process was the key, and by that I mean two things: Taking the drips off a month before harvesting (to let the bulbs dry out in the ground and start the process) and hanging them vertically on a rack in the hot, dry garage. Our former method of piling them up on top of the chicken coop just didn’t dry them properly. But I’m getting ahead of myself.

IMG_4694.jpg

I said I followed my ‘proclamation’ mostly to a T. Looking back at my notes, I actually planted the garlic on September 29, a full month earlier than I said I would. But I do remember preparing the bed, because I did something differently - I forked it up (I usually practice no-till), mixing in two inches of compost as well as a large bag of vermiculite. Knowing that I was planting into a location that is soggier than the rest of the garden (I guess it’s a low point of a yard that seems entirely flat), the compost and vermiculite were key to providing good drainage. The location was in the Southern part of a yard under a deciduous tree, so it got full winter sun, as well as late spring shade. We covered it during the winter with Agribon, as we do all our winter crops. The garlic germinated fast in that warm fall weather, and as soon as it had some good growth, I seeded in crimson clover to provide a low cover and extra nutrients. When the cover came off in late winter, the clover took off, and I remember having to pull some of it out, along with some accidental cilantro that I had previously seeded there and that enjoyed growing over winter (this was a great tip for me for following seasons, I do better with cilantro over winter than I do over summer). After clearing out some of that excessive cover crop growth, the garlic grew further. On April 1, I removed the drip lines to begin the drying out process, knowing that we’d have some rain. I harvested the garlic May 22, earlier than my original June 1 goal. Then Tom built me the drying rack for the garlic and it went in the garage that night.

All of these practices allowed for a great harvest, so I shall follow them to the letter again this fall. Again, I am just ridiculously pleased with this harvest, it is the best one we have ever had. We’ve often had more, but never better formed.

Did you grow garlic this past winter? How did it fare? I’d love to know your results.

Tags garlic, vegetable garden
Comment

Tomato Strings

June 19, 2020 Elizabeth Boegel
IMG_4669.jpg

A quick update about how the tomatoes are doing on their new ‘outdoor greenhouse’ system. I really like this way of growing tomatoes, though I have had some learning experiences that make me realize I can do it more efficiently next year. I’ve also had some successes and I want to share both with you.

Tying the strings on the top is fine, but it would be more efficient to have the greenhouse pulley systems that allow you to tighten or loosen strings easily, because if I want to do that now, I have to get out the ladder, lean over in a precarious position, and retie the string. I’ve had to do this several times, either to tighten up strings that were too loose, or because I inadvertently cut the string while pruning the plants. Also, having the strings anchored at the bottom is apparently unnecessary, because the plastic clips should be enough to keep the string taut if applied correctly, which I am not doing.

I’m growing the plants so closely together that they need to be vigorously pruned, so it takes an hour or two each week to keep them tidy. Also, the string loosens over time and with the weight of the plant, so keeping them pruned helps avoid a lean.

IMG_4686.jpg

We had two plants cut down in their prime by some woodland creature; something just nibbled at the main stem until the plant was effectively cut down. Both are in a place where I’m sure animals tend to cross the garden and the plants were in the way, so the animal got rid of them. Evidence of both halves of the plant shows that nothing was eaten. I have had a few lower tomatoes nibbled on by rats (I think rats anyway, not sure) but as the plants have grown and the tomato clusters have been too high to reach, that has stopped. Also, when I get to pruning, I often inadvertently cut off the leader, which has happened to three plants this year, so now I am waiting for a side shoot to grow long enough to become the new leader. No big deal, just some frustration on my part for not being more meticulous.

One brilliant success is that there is no evidence of blossom end rot this year. I’ve written a lot of posts about this issue before, and all my research tells me that it’s due to a water problem, not a calcium problem. So I have been very good about watering consistently. When I started the drip system on them in April, it was tempting to give them less water because it wasn’t hot yet. Instead, I started them on the 10 minutes per day watering that I knew they would need in July. The amount of water is not as big a deal as the consistency is. This way the plant grows up knowing how much water it has to complete its various systems and becomes used to that amount and works with it. It becomes efficient. That’s the idea anyway. So even when it gets over 100 degrees for weeks at a time, I will still keep the tomatoes at 10 minutes of drip a day. It seems to be working so far (and the weather has worked with me this year, as we got very little rain in May compared to last year), and with no evidence of blossom end rot, I believe this kind of watering is the key. Of course I also grow varieties that are thick and meaty, more round or heart shaped, rather than long and skinny, because the BER seemed to show up only in long and skinny types.

IMG_4684.jpg

I have many purple tomatoes this year, as well as pink and yellow and orange. I do have some true reds but I tend to prefer a mix of colors and flavors. I am also trialing some new varieties and will report on them when it gets further along in the season.

We have yet to eat our first ripe tomato. This is pretty much on par with every summer, although last year we ate our first Sungold cherry tomato earlier in June. Sungold looks to be the winner again this year, as there are three that are almost ripe enough to eat. We had our first pesto a week ago, and when we have our first Caprese salad, then I will declare that it is well and truly summer.

How are your tomatoes coming along?

Tags tomatoes, vegetable garden
Comment

June Arrangement

June 13, 2020 Elizabeth Boegel
IMG_4646.jpg

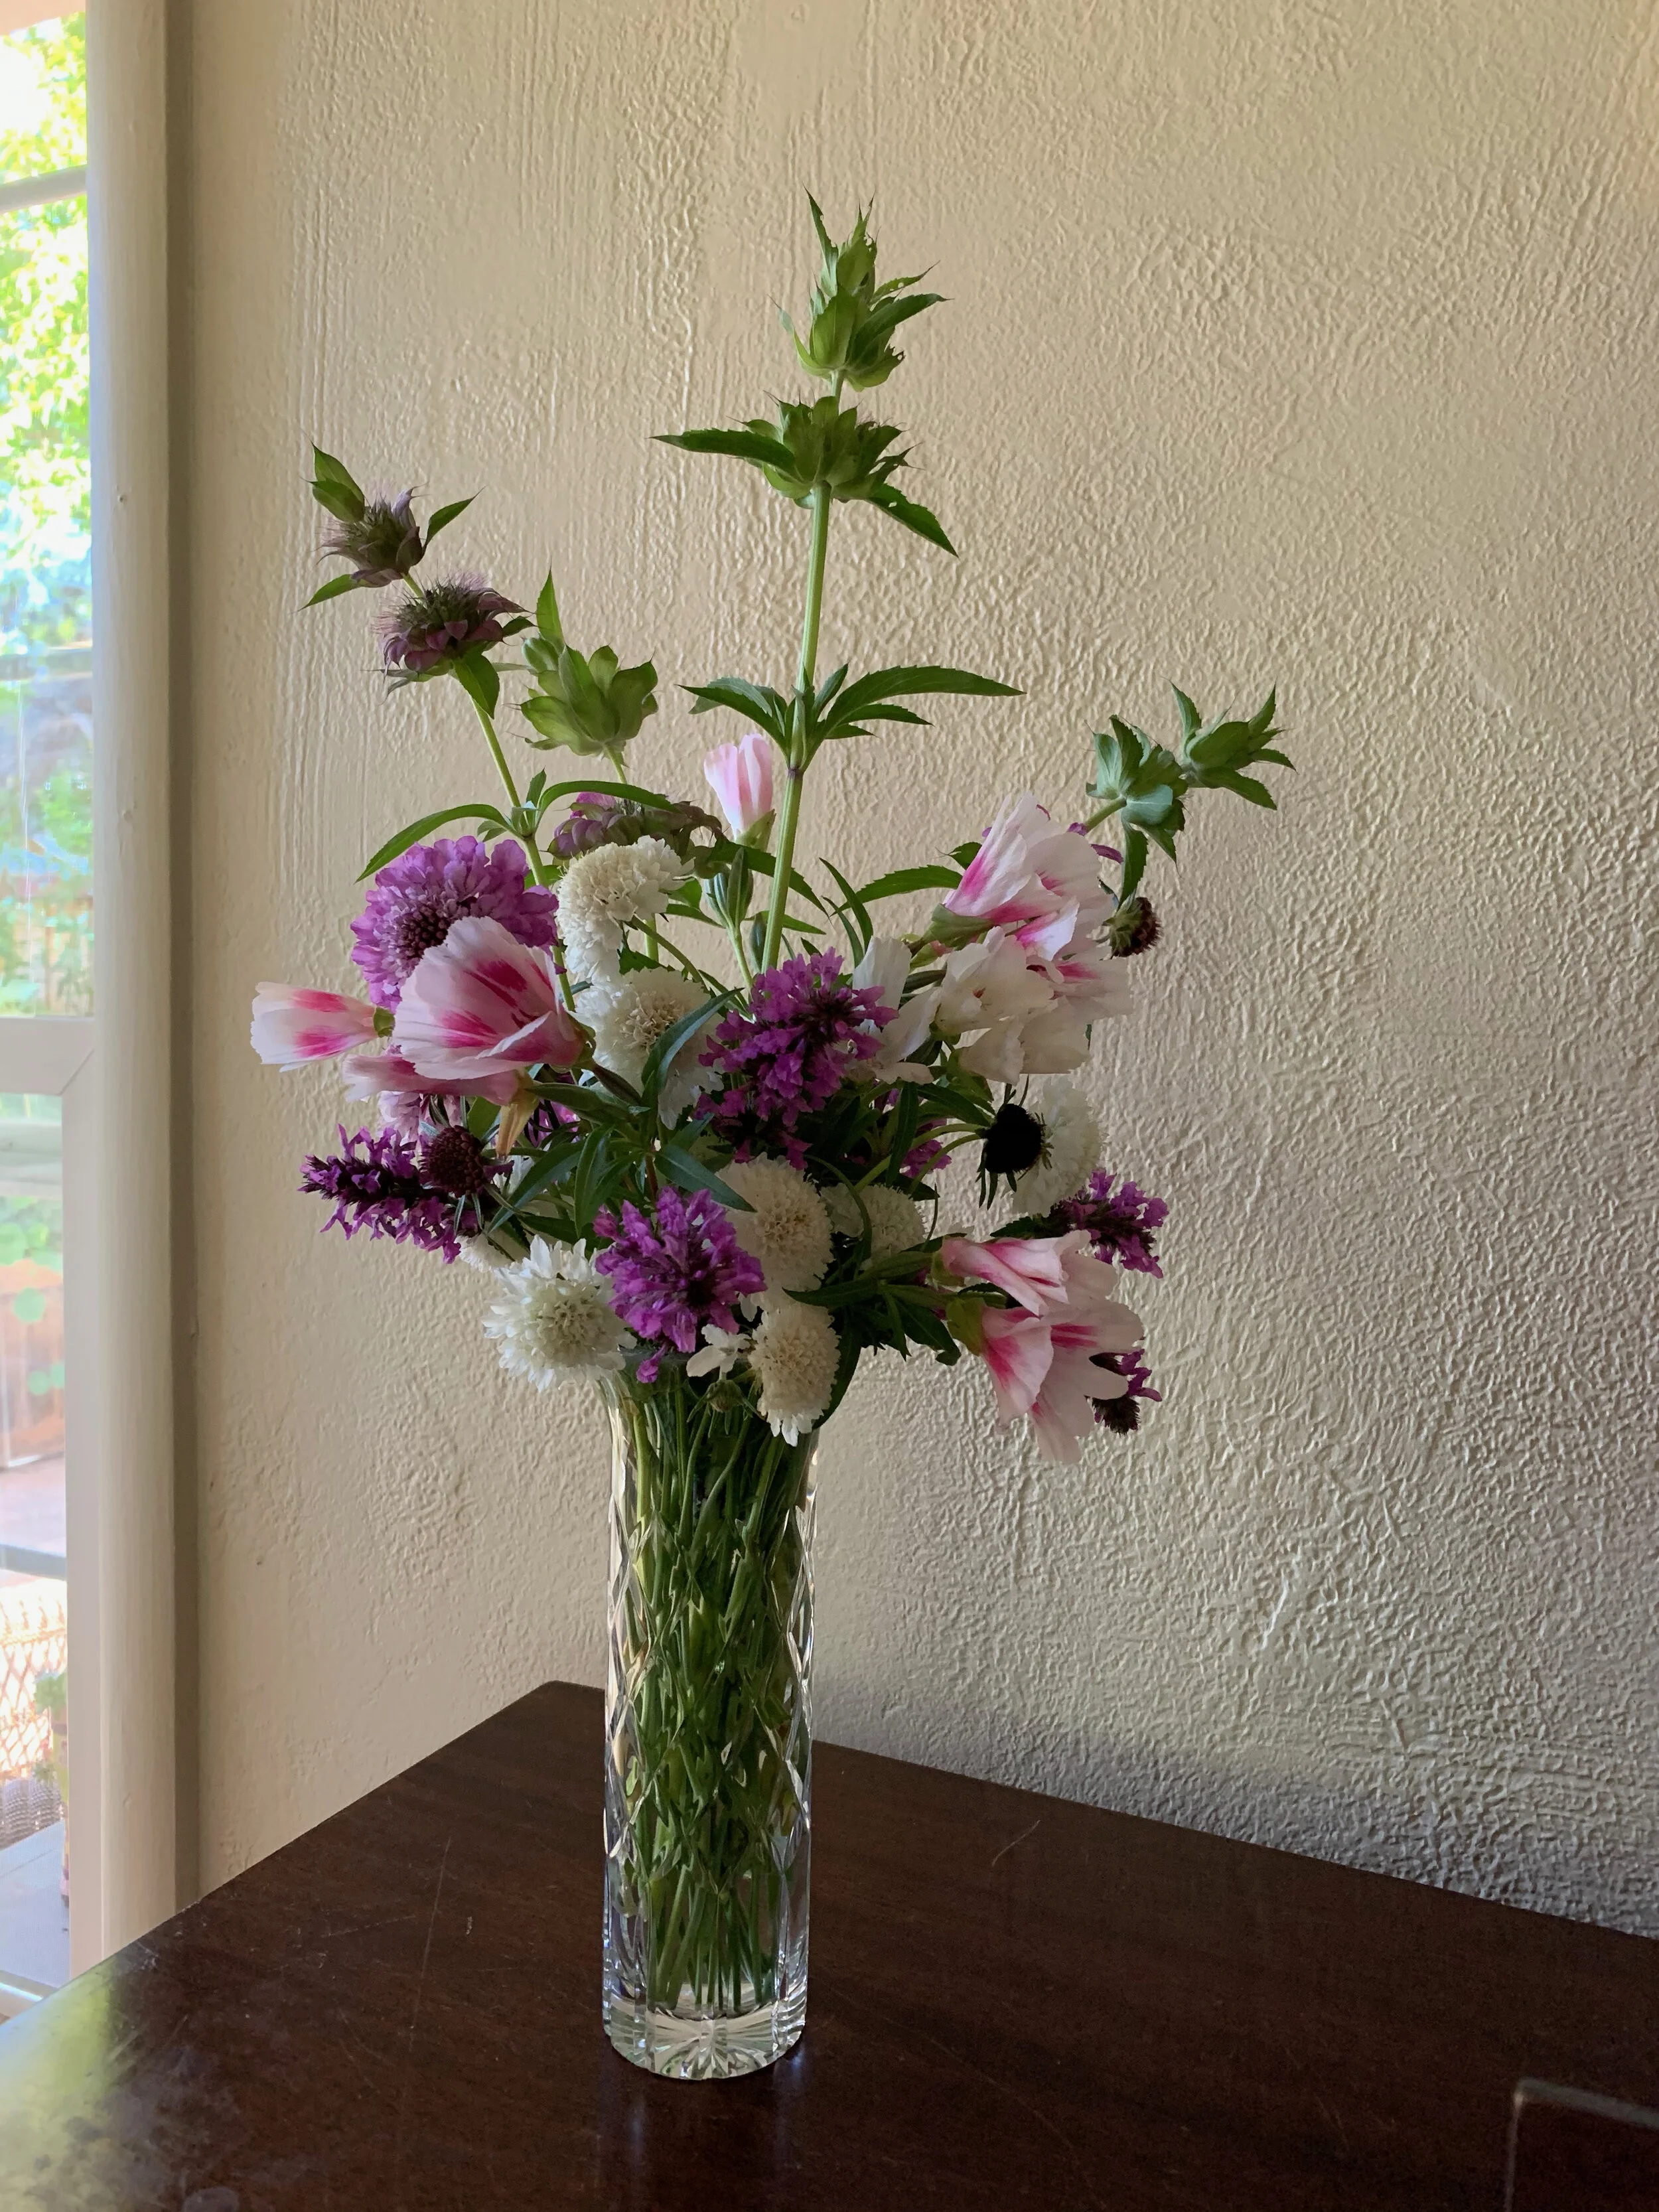
I really like to go out into the garden with some clippers, choose certain flowers that I love, and make an arrangement in my hand. A posy, of sorts. Nothing fancy, nothing terribly creative, just wading through the blooms and picking what catches my eye, and then plunking them in whatever vase is handy at the moment. This is my favorite kind of arrangement.

Today, the Monarda citriodora (bee balm or wild bergamot), Scabiosa atropurpurea (pincushion flower), Agastache (sorry, can’t remember which kind), and Clarkia ‘Farewell to Spring’ were calling me, so that’s what I chose.

IMG_4644.jpg

I’d love to know what’s growing in your garden!

Tags seasonal flower arrangement, flower garden
Comment

Don't be Afraid to Edit

June 8, 2020 Elizabeth Boegel
IMG_4601.jpg

Pictured above is a flower I’ve been excited to see this year - a Sherbet-toned Chantilly Mix snapdragon, from Floret Farms. They’ve just begun to bloom, and I anticipate a fabulous display. I am growing them in a container this year, and if they do well, I’ll collect the seed and scatter it elsewhere next year. I’ve never been particularly keen on snapdragons, but I think this mix is lovely and delicate, and adds to the cottage-y feel of the garden.

I’ve had several friends (the desire to make a beautiful and productive garden, during this time of shelter in place, is definitely widespread, and I’ve had more interest in my garden and my services then I’ve ever had before), express a recurrent theme that I want to discuss: Don’t be Afraid to Edit.

You may have an established garden that you planted yourself, or you may have a garden you’ve inherited; you may be new to gardening, or an experienced gardener; the advice is the same regardless. If something in your garden isn’t pleasing you, and you’ve had it there for a long time, and you’ve tried many times to make it look good by pruning or feeding, and it still bothers you - TAKE IT OUT and start again. You do not have any obligation to change your feelings about this particular plant. You may have loved it once, you may have always hated it. No one is going to come into your garden and say “Oh my God what did you DO?” or if someone does, just tell them you decided to make a change. It’s YOUR garden, after all.

Sometimes we’ve looked at the same things over and over again for years and we can’t imagine the space looking different. Maybe our eyes have always drifted past that place and settled on a more pleasing grouping. I would advise that you allow yourself to really look at that space. Ask yourself a few questions: What is it that isn’t working? Why does it bother you? or alternatively, why are you ignoring it? If you could dream up anything, what would it be? Is there something you’ve always wanted to add to your garden, but haven’t had room? Don’t edit your thoughts, just let yourself dream. You may just come up with an exciting new plan.

See, the thing is, right now (and conceivably in the future as well), if we’re fortunate enough to have any kind of outdoor space, be it a back patio, a front porch, a balcony, or a garden - it’s all we have. Along with our homes or apartments, this is our safe place. You may be, like me, taking a fresh look at the way the interior of the house works and looks, and thinking of things to make it more comfortable and efficient. Why would your garden be any different? In many seasons, your garden can be an extension of your living space, another room that is underutilized at the moment. And I’m not talking about enormous expensive changes, though if you have the money and desire, more power to you (although I’m a big fan of doing it yourself). I’m talking about making these spaces pleasant for those who want to dwell in them.

And if something bothers you, why live with it? If you have an old, woody lavender that barely blooms anymore, and you feel like you should leave it because the blooms are good for pollinators, and you like the smell, why not chop it back and see if it improves? Or maybe, take it out, increase the drainage in the soil by mixing in compost and grit, and plant three different kinds of lavenders in the same spot? Or maybe that’s the ideal place for several Mediterranean herbs like lavender, rosemary, and thyme, which can be beautiful AND useful, both for you and the pollinators?

After meeting with some clients who are new to a property and have no attachment to anything already there, I am feeling emboldened and ready to make a few changes of my own. I also recently read ‘Planting: A New Perspective’ by Piet Oudolf and Noel Kingsbury, and it inspired me to try this sort of ‘modern meadow’ somewhere in my own garden. I am thinking of replacing the largest pollinator garden with a planting of this nature. Something like this:

image credit: detroit.curbed.com

image credit: detroit.curbed.com

or this:

image credit: Town and Country Magazine

image credit: Town and Country Magazine

It won’t be able to look exactly like this in my California garden, but I can come close; I can mimic the ‘dune’ look with these mounded plantings and grasses and perennials, all of them adapted to my area. This will take less water overall than the planting scheme I have now, and decidedly less maintenance. It will require that I move some plants that I really like, and remove some others. It will require that I think highly about structure and form. It will require that I add a lot of amendments to improve the soil texture, as this kind of planting requires excellent drainage. In other words, it will require me to look at this space with fresh eyes and do the work required to make a change. Any of us can do this. Many plants can be started from seed, which keeps the cost down. The thing it will require more than anything else is a willingness to edit and change.

So I would encourage you to do the same. Don’t feel you have to live with something that isn’t working for you. It can absolutely stymie the creative flow of the gardener.

In other news, I tried making my own low-nutrient fertilizer from comfrey leaves. This is something that is recommended by one of my idols, Monty Don, and he makes and uses it every year in his own extensive and beautiful garden. I was and still am skeptical of this fertilizer because I don’t understand how it works and I would like a scientific study that tells me that information, but I have searched and searched and cannot find anything, so I decided I would just try it. It requires lots of comfrey leaves, which luckily I have in abundance, which you chop and cover with water, and then simply let sit and fester for three weeks. Strain, dilute, and apply.

IMG_4419.jpg

This is a picture I took at the beginning of the process. I could not bear to take a picture at the end. The mass was slimy and brown, and the resulting ‘water’ was fetid, and the smell, oh my Lord the smell, like a manure lagoon at a concentrated animal feeding operation. Just simply terrible. Of course that dissipated as soon as I diluted it and added it to the soil around my tomatoes and peppers, thank goodness. It smells because it’s an anaerobic concoction, and it’s this that makes me skeptical: Compost works because it is aerobic. Oxygen is neccessary for the good microbes to live. This was the exact opposite and I’ve heard only bad things grow in anaerobic conditions. And yet Monty (and so many British gardeners) swear by it! So I am just befuddled. Of course I have no way of knowing if it is improving anything, and it’s all circumstantial anyway, as I haven’t done any kind of scientific trial.

Oh yeah, did I mention the smell? My family always complains about the stench of my usual fish and seaweed fertilizer, but that smell is positively pleasant compared to the comfrey feed, and methinks they will not complain in future.

One other item today, and that is those plastic clips that I got for the tomato vines.

IMG_4599.jpg

As you know, I’m not a fan of plastic, but I needed these specially designed clips (which are normally used in greenhouse growing) to help my tomatoes grow ‘up’ their strings. And they work great for that, are easy to use, and can be reused next season. What I’m discovering is that these clips are quite handy for other purposes, like clipping cucumber vines to the trellis, and clipping raspberry vines to their stakes, and clipping squash vines to the strings on the teepees. I guess, basically, they are good for securing various vines to their supports.

IMG_4593.jpg

I have found in the past that using string or twine can sometimes hurt the stems of plants - it can cut into them and damage them. These clips allow for smooth movement between the vegetation and the support. They are cheap, and reusable. They will just take a little more work at the end of the season, because I usually just cut down the vines with their strings and throw the whole lot into the compost.

Now that we are ‘at the doorstep of summer’ (as my pal Monty likes to say), how is your garden looking? Are there places that you’d like to make a change? Are their places that are really succeeding and you want to share your methods? Please feel free to add your comments! I love to know how your gardens are growing.

Tags learning, flower garden, tools, fertilizer
2 Comments
← Newer Posts Older Posts →

Subscribe

Sign up to get email when new blog entries are made.

We respect your privacy. We're only going to use this for blog updates.

Thank you! Please check your email for a confirmation notice to complete the subscription process.

Summary Block
This block is invalid. Please check the block settings and try again.
Featured
Aenean eu leo Quam

Powered by Squarespace